Tag Archives: recipe

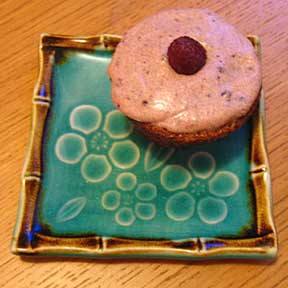
Luscious Vegan Chocolate Raspberry Mousse

Oh, you better believe I was skeptical about this one. I never pass on chocolate, but c’mon… chocolate tofu? Ew, I dunno. I’ve never been a big fan of tofu or soy products, but exploring Eastern cuisines helped me to accept it and occasionally enjoy it. Now, I’m learning to cook with it. Welcome to my kitchen, tofu.

vegan chocolate raspberry mousse dessert

There are no eggs, cream, or butter in this dessert, yet it is fluffy, creamy, and quite pleasant on the palate. Maple syrup is the primary sweetener (use the real thing), along with raspberry jam and some melted chocolate to make it extra rich. Seriously, if you don’t tellem it’s tofu no one will guess.

Vegan Chocolate Raspberry Mousse

  • 2 TBS Olive Oil
  • 2 TBS Cocoa
  • 1/2 C (melted & cool) Chocolate Chips
  • Dash of Almond Extract
  • 2 300ml packs of SOFT TOFU (about a pound)
  • 3 TBS Raspberry Jam
  • 3-4 TBS Maple Syrup
  • Fresh Raspberries

Let the tofu come to room temperature. Gently melt the chocolate chips (use very low heat or microwave) then blend in the olive oil and cocoa powder. Set aside to cool.

Whip the tofu, raspberry jam, almond extract, and maple syrup until smooth and fluffy. Stir in the chocolate mixture and a big handful of fresh raspberries. Chill thoroughly before serving.

*NOTE: This makes yummy frozen popcicles!

Rainer Cherry Clafoutis

Clafoutis ~ I’ve heard the name tossed about on food TV frequently the past few days, and today it was all I could think about when I saw a stack of beautiful, blushy Rainer cherries at a Granville Island produce stand. This French dessert can be made with any stone fruit (think peaches, plums, apricots) or even with berries, but the classic version from the Limosin region of France uses black cherries.

Rainer Cherry Clafoutis with vanilla ice cream and cherry sauce.

Technically, a clafoutis using anything other than black cherries is a flaugnarde, so says the intertoobs, and in traditional recipies, cherry pits are not removed before baking. Leaving the pits is said to enhance flavour, but I didn’t want to have to pick around them, so I pitted my cherries.

Ingredients are simple: egg, milk, flour, flavour, a little butter or oil. Clafoutis batter is rather thin, like crepe batter, and is usually flavoured with almond or vanilla. It puffs up during baking and cuddles around the fruit as it sets. In fact, it’s very much like making a Dutch Baby pancake.

This was my first attempt at clafoutis, and it turned out quite well. Gingerman liked it, and we had the leftover portion for breakfast the next day. I half made up a recipe on the fly because I had only 2 eggs and a strangely shaped dish. A few more experiments, and I’ll come up with a reliable version of my own. Meanwhile, I found some inspiring recipes online and gathered a bit of clafoutis wisdom to share.

Baking Tips for Clafoutis:

  • Butter & Sugar the baking dish: Butter the bottom and sides of the dish, toss in a couple of tablespoons of sugar, and shake it around to coat the dish. Dump excess sugar that doesn’t stick.
  • Experiment with different fruits and flavour extracts or liquers.
  • Sift the flour to prevent clumps.
  • Bake individual clafoutis in muffin tins or ramekins.
  • Do not open the oven door until the end of baking time!

Recipes for Clafoutis:

Leaving a comment? I’m curious . . . how do you like to eat cherries?

We are all Julia’s Children.

A while back, I had the pleasure of seeing Julie & Julia on the big screen. I don’t typically shell out movie theater dollars to watch a pseudo-documentary (Big Screen money is for Star Wars, the Terminator movies, and Beowulf 3-D), but this was special. I grew up with Julia Child.

Every Saturday on PBS, I’d sit with Mommie Dearest and my sisters while the menfolk were off somewhere getting dirty, and we’d learn how to roast a goose, bake a gateaux, and flip an omelette. By the time I came along, Julia was in color, but reruns of the black and white show were frequent.

It didn’t matter whether we ever tried her recipes or not. We loved her. She made cooking significant and entertaining. And because of Julia, we began to explore more sophisticated flavours and techniques. My brothers can make roadkill stew. My sisters and I can make burgundy beef. It pays to watch Public Television. Between Julia Child and Betty Crocker, there were a lot of good eats at our house.

It’s my birthday week, and I’m glad to be here to share something I learned from la plus belle chef du monde: a simple recipe for Potato Leek Soup. I had a plan to attempt Julia’s Boeuf Bourguignon for the first time, but the recipe is involved and I wanted something to sate our hunger until the big dish was ready. Soup was just the ticket. Both recipes came from Julia’s Kitchen Wisdom, a small book compared to her others, but chock full of basic master recipes and excellent tips for everything from preparation to garnish. It’s an essential reference on my kitchen bookshelf. The Boeuf Bourguignon was also a great success, but that post is for another day. I’m still enjoying the leftovers.

Potato Leek Soup

This is the very first recipe in Kitchen Wisdom, and with good reason. It’s in a section called “Primal Soups” which Julia calls “the least complicated and often the most loved.”  Its versatility is extraordinary, served hot or cold, you can leave it chunky and brothy or puree it smooth and add something creamy. To boost the flavour, I chose to use both chicken stock and water, and I sauteed the leeks briefly in a teaspoon of rendered bacon fat. Don’t panic, it’s one itty bitty teaspoon in a whole 2 quarts of soup (that’s at least 6 servings, more if you stretch the leftovers a bit with some extra milk or cream).

Preparing Leeks:

  • One big leek plus one small leek yeilded about three cups sliced. You’ll use most of the white part and some of the green part.
  • Cut off the root and a few inches off the top leaves.
  • Split the leeks in half lengthwise and spread them apart under cold running water to remove any dirt between the layers.
  • Slice the leeks crosswise into thin strips.

In a saucepan over medium heat, briefly saute 3 cups sliced leeks in 1 tsp bacon fat (or olive oil or butter). Add 3 cups of chicken stock, 3 cups of water, 1 1/2 tsp salt, fresh ground black pepper, and 4 baking potatoes (peeled and diced).

Bring the pot to a boil and simmer about 20-30 minutes until potato chunks are tender. Remove from heat and stir in 1/2 cup sour cream. Taste and add more S&P if needed.

NEXT DAY: “Baked Potato” Leek Soup

Heat leftovers and garnish with shredded cheddar cheese, a dollop of sour cream, some chopped green onion, and bits of crisp-cooked bacon.

Clever Comfort: Stand Up Mac & Cheese

rigatonicakeThis dinner was inspired by Martha Stewart and the need to use stuff up (namely, half a brick of cheddar cheese). A while back, I discovered the rigatoni “cake” at Martha Stewart dot com. The idea was too clever not to try, so I used my own red sauce recipe and followed the assembly instructions successfully. The end result: a delightful looking cake of tall pasta tubes with cheesy topping. Sliced in giant wedges, it just begged for candles and a round of Buon Compleanno. It’s the kind of recipe that delivers . . . provided you are patient and attentive to details.

Tonight, I decided to try a cheesy version. I made two individual portions in a pair of mini-springform pans for dinner and prepared the rest in a smaller baking dish to freeze for later. With a little garnish of bacon and tomato salad on the side, this comforting meal is sure to satisfy. We had some tilapia and white wine to go with. Next time, I think I’ll skip the fish and make a bigger salad.

standupdinner

Standup Mini Mac & Cheese with potato crusted tilapia and salad.

The process might seem complicated, but it’s really easy and fun to do. Kids could definitely help with the recipe, and the results are really special.  Dinner was awesome, and I can’t wait to do it again.

Tips For Success:

  • Rigatoni: Don’t overcook the pasta. To make sure the tubes don’t collapse, boil them approximately 8 minutes so they are slightly underdone. Tossing the noodles with oil and parmesan helps the pasta stick together and stand up in the baking dish. Pack them in the dish gently so the tubes don’t close. Can’t fit all the tubes? Use the leftovers to make tomorrow’s lunch or a midnight snack.
  • Cheese Sauce: The sauce must be thick enough to cling, but thin enough to pour. Inexpensive cheddar, American cheese, or Velveeta will make the creamiest sauce, but many combinations of cheese will work nicely, so there’s a little room to experiment according to your taste.
  • Crust: Fancy Mac & Cheese deserves a delicious crust. Seasoned bread crumbs, cheese, potato chips, cornflakes . . . however you like it. A tasty crust helps protect the pasta ends from hardening during baking. To prevent cheese sauce leaks: sprinkle a little crust mixture on the bottom of the pan before you assemble the pasta.
  • Baking: A springform pan makes the perfect shape and best “cake” presentation, but I’ve also used a rectangular glass baking dish (cut squares for serving).  Put the baking dish on a cookie sheet to prevent spills in the oven. Be sure to let the baked pasta cool at least 15 minutes before cutting.

Stand Up Mac & Cheese

Mini Mac

Mini Mac

It’s all about the technique . . . and that yummy cheese sauce! I managed to make the sauce in the time it took to boil water and cook the rigatoni. If you aren’t confident about juggling two tasks at once, make the pasta first and assemble it in the baking pans, then focus on the sauce. Use a springform pan for the prettiest results and easy slicing. A regular baking dish with high sides will do, though.

Cook the Pasta

  • Cook 16oz rigatoni (~450g) in boiling salted water about 8 minutes (a little underdone).
  • Drain pasta, rinse briefly in cold water (to stop cooking), and drain well.

Assemble the Pasta:

  • Toss cooled pasta with 1 Tbs olive oil, S&P, and 1/4 cup grated parmesan.
  • Grease a 9″ springform cake pan (or whatever pan you’re using)
  • Arrange the pasta tubes (standing on end) in the baking pan. Tilt the pan slightly as you build the rows of tubes, so they don’t fall over. Pack tightly but gently, so tubes stay open to hold the sauce.

Add The Cheese:

  • Make the Cheesy Bechamel Sauce (recipe below).
  • Spoon the cheese sauce over the pasta, allowing it to run between and into tubes. Don’t worry about completely filling the tubes.

Make The Crust:

  • Combine about 1 1/2 cups fresh bread crumbs with 1 tsp thyme, 1/4 tsp paprika, and S&P. Toss with 2 Tbs olive oil and 1/2 cup grated cheddar cheese.
  • Sprinkle topping over rigatoni, pressing into place.
  • Cover the pan with foil (a little olive oil on the foil helps keep it from sticking).
  • NOTE: You can stop at this point and refrigerate or freeze to bake later.

Ready, Set, Bake!

  • Preheat oven to 400°
  • Bake 15 minutes, then remove foil.
  • Bake another 10-15 minutes until crust is lightly browned.
  • Let rest at least 15 minutes before serving. Run a knife along the side to loosen pasta, then remove the outer ring of the springform pan and cut in slices.
  • Garnish with real bacon bits and fresh tomato slices.
  • NOTE: If baking from fridge/freezer, use 350° oven and bake ~ 45 minutes, then remove foil and bake (or broil if pasta is well heated) until topping is lightly browned.

Cheesy Bechamel Sauce

Fat plus flour equals a roux, the beginning of any good gravy or thick sauce. Cook and stir, cook and stir. Watch over your sauce as it cooks, and stir constantly.

  • In a heavy saucepan, melt 2 Tbs butter with 1 Tbs olive oil over medium heat.
  • Add 2 Tbs flour and stir a minute or two, then add 2 cups cold milk, stirring briskly to combine.
  • Season with S&P, 1 tsp mustard, a dash of granulated garlic, a little fresh grated nutmeg, and a dash of worchestershire sauce.
  • Stir frequently as the mixture returns to a boil, then lower the heat a bit and cook until it begins to thicken (stir constantly).
  • Cook a few minutes more until it reaches a saucy consistency, then turn off the heat and stir in 2 cups grated cheddar and 1/4 cup grated parmesan until sauce is smooth.

S’mores Day Cookie Bars

Roasting Marshmallows by ninahale

Roasting Marshmallows by ninahale

I love S’mores. Melty chocolate and gooey marshmallow sandwiched between crisp graham crackers is a time-honored campfire treat. Countless times, I sat staring into the flames, twirling a big puffy marshmallow on on the end of a hand-picked green stick whittled to a fine point, waiting for the perfect browning. Too close or too long in the wrong spot, and it would burst into flame. Sometimes accidents happen on purpose. Please hand me another marshmallow.

In honor of National S’mores Day (August 10th) and the Girl Scout tradition, I present to you this glorious S’moresel from my kitchen. All that traditional smoresy taste in a convenient cookie bar form. I guess that’d be a S’mookie!

Gimme S’more Squares

The recipe for Warm Toasted Marshmallow S’more Squares @ Betty Crocker is pure genius. No eggs required, and totally EASY! Whenever I find the sugar cookie mix on sale, I like to stock up so I can make quick treats like these. They’re totally delicious, pack perfectly in lunches, and go great with coffee or a big glass of cold milk.

Golden Toasted Chocolatey Delicious

Golden Toasted Chocolatey Delicious

I tweaked the recipe a little to produce a smaller batch with more graham flavour and decided to break out some gourmet chocolate bars for the topping. I used Dagoba Organic Dark Chocolate, but many other flavours would be yummy. Also, try your local store brand graham crackers; Safeway’s grahams have an excellent texture and taste and cost less.

Get Ready
  • Preheat oven to 375° and grease a 9×9 pan.
  • Chop fancy chocolate bars to make about 1 1/2 cups of chocolate bits.
  • Bash or food process about 8 graham crackers to make 1 Cup of crumbs.

Make a Grahamtastic Cookie Crust

  1. Mix 1 Cup of Graham Cracker Crumbs with 2 Cups (about 1/2 bag) of Betty Crocker Sugar Cookie Mix.
  2. Melt 1 stick of butter, stir in 1 tsp Pure Vanilla Extract, and add to dry ingredients.
  3. Press dough into pan and bake 18 minutes.

Add the Chocolate and Marshmallows

  • Lightly browned!

    Lightly browned!

    When the cookie crust is done, turn off the oven and preheat the broiler.

  • While the crust is still warm, sprinkle 1 1/2 cups chopped chocolate over top and let it melt. Spread melted chocolate to edges of crust.
  • Top with 2 cups miniature marshmallows and return pan to oven about six inches below the broiler.
  • Broil until marshmallows are lightly browned ~ 1 min (watch them carefully!)
  • LET THEM COOL—I know it’s hard.
  • Cut into squares and NOM!

Other S’more recipes:

Flickr Creative Commons
ninahale

Garlicky Gammon BLT with Havarti Cheese

The BLT on toast with mayo is a classic sandwich, infinately tweakable. This version takes advantage of fresh summer veggies, and the toast and bacon get an upgrade. Creamy Jalapeño Havarti brings everything together with a little kick of spice. There’s mild garlic flavor in the buns, which get a good shmear of garlic butter before being toasted crisp and golden, and a final drizzle of yummy dill and garlic flavoured yogurt dressing instead of mayo. The dressing also makes a nice dip for carrot sticks or chips.

How to Cook Gammon Bacon:

Gammon bacon is not like ordinary bacon. One slice contains two portions: a round piece from the loin (back bacon) attached to a streaky piece from the side, effectively providing two distinct meat experiences.

gammon bacon I separate the loin from the streaky part and pan fry the pieces over medium low heat. The loin piece is quite lean and should be cooked through but remain tender (a minute or two each side, depending on thickness). Cook the streaky parts a bit longer over low heat so the fat renders off and the pieces become crispy. Drain them on paper toweling.

Garlicky Gammon BLT

This recipe makes two sandwiches. One slice of gammon bacon per sandwich is plenty, but for a more generous serving of meat allow two slices per person. I know, you can’t see the bacon in the picture. Really, the bacon is in there; I swear! Fellow Foodie Fotographers: if you have any advice for sandwich posing, I’d love to hear it.

gammon BLT

2 Nature’s Blend Olive Oil & Garlic Buns
Garlic Butter
Handful of baby field greens
Havarti Cheese with Jalapeños
Two slices Gammon bacon, cooked
One heirloom tomato, sliced
Garlicky Dill Dressing

  1. Make Garlic Butter:
    Mix 2T softened butter, 1 garlic clove minced, dash of paprika, S&P.
  2. Make Garlicky Dill Dressing:
    Combine 1/2 cup plain yogurt, 1/8 tsp granulated garlic, 1/2 tsp dried dill, S&P.
  3. Spread buns with garlic butter. Toast under broiler until golden. Let them cool.
  4. Place sliced Jalapenño Havarti Cheese on the bottom bun, then top with cooked Gammon bacon, baby greens, and tomato slices.
  5. Drizzle with Garlicky Dill Dressing and add the top bun.
  6. Enjoy thoroughly.

Strawberry Cornmeal Cupcakes with Prairie Berry Frosting

A while back, I joined up with Iron Cupcake Earth in the interest of stimulating my baking muse. Each month they challenge bakers to come up with creative ways to use a particular ingredient and make nommy cupcakes. Of course, there are PRIZES, too! I love prizes.

The Milwaukee Cupcake Queen’s decree for June: SUMMER BERRIES.

Sweet Summer Strawberries

Sweet Summer Strawberries by ellievanhoutte

So many possibilities! Raspberries, strawberries, blackberries, blueberries, snozzberries . . . and so many ways to use them. This weekend, the farmers market was full of fresh organic strawberries, and it was high time I took up the Queen’s challenge. This is my first attempt at an Iron Cupcake, and I’m pretty well satisfied with the results. Ginger Man ate three right off the bat! It was a tasty adventure, plus I got to use some of my favourite things:

  • Fresh Fraser Valley Strawberries
  • Citrus Salt by Maison Coté
  • Bonne Maman Prairie Berry Jam: a mixture of raspberries, blueberries, blackberries, and strawberries. Made in France.
  • Silicone Cupcake Liners: super-easy cleanup and no trash!

Strawberry Cornmeal Cupcakes with Prairie Berry Frosting

strawberrycckeThe addition of a little cornmeal to the batter enhances this cupcake’s texture without making it taste like cornbread. It’s a sweet cake, not savoury, and the baked tops have a pleasant toothsomeness.

Note: Mix the batter with a regular ol’ wooden spoon so the ingredients don’t get overmixed. For the frosting, use an electric mixer for best results.

Cook the strawberries:

In small saucepan, combine 1 pint fresh strawberries (quartered), 2 Tbs sugar, 1 Tbs fresh lemon juice, and a few grinds of Citrus Salt. Bring to a boil and simmer until thickened and reduced by about half. Set aside to cool.

Mix the dry ingredients:

  • scant cup sugar (not quite a full cup)
  • 1 cup flour
  • 1/2 cup cornmeal
  • 1 tsp baking soda
  • 1 tsp baking powder
  • 1/2 tsp salt

Mix the wet ingredients:

  • 1 beaten egg
  • 1 tsp vanilla extract
  • 2 Tbs melted butter
  • 3/4 cup milk

Combine the mixtures:

  • Gently stir the wet ingredients into the flour mixture until just combined.
  • Do not overmix.
  • Fold the cooked strawberries into the cupcake batter.

Bake the cupcakes:

  • Divide batter among 12 lined muffin cups.
  • Bake at 375° for 20-25 minutes.
  • Cool completely before frosting.

surprise inside*At the last minute, I decided to add a little surprise when the cupcakes came out of the oven. While the cakes were still warm, I scooped out the center of six cupcakes and filled them with a few mini chocolate chips. Strawberries love chocolate, and so do I. Covered with frosting, they all looked the same. The little extra chocolate boost was fun to find!

Make the frosting:

  • Whip 1/4 cup softened butter until fluffy.
  • Gradually add 1 cup powdered sugar, beating well.
  • Add 1 tsp vanilla extract and 1 Tbs milk. Beat well.
  • Stir in 2 Tbs Bonne Maman Prairie Berry Jam
  • Spread frosting on cooled cupcakes.
  • Garnish with berry of your choice.
Flickr Creative Commons Photo
by ellievanhoutte

Thanks for your votes! This month’s winning cup cake was:

Not-so-blue-berry Cupcakes from How To Eat A Cupcake

Mango-Avocado Salsa (no tomatoes)

When I think salsa, I automatically think about tomatoes and tortilla chips. But “salsa” is really just a word for “sauce.” They can be chunky or smooth, with or without heat, and use a variety of ingredients. This chunky salsa features mangoes and avocados. The flavour is fresh and bright, creamy and a little bit sweet. Chopped raw shallot adds a spicy little kick at the end. Super easy to make, very nutritious, and perfect for a summer picnic. Goes really well with pork or chicken, too.

Mango Avocado Salsa

  • mango salsa1 ripe mango, diced
  • 2 small avocados, diced
  • 1 small shallot, finely chopped
  • juice of one lemon
  • a little lemon zest
  • dash of garlic powder
  • S&P to taste
  • chopped fresh cilantro

Mix everything together in a bowl. Store leftovers covered in the fridge.

It’s My Breakfast: Mango Peach Cobbler

Mango Peach Cobbler with Milk

Mango Peach Cobbler with Milk

I can hear it now: “You can’t eat cobbler for breakfast!”

Oh yeah? Watch me.

Mangoes are bountiful and ripe in the local produce markets, and these are one of my favourite tropical treats. June is Mango Month, and there are tons of ways to play with this delicious and sexy fruit in your kitchen. The flesh is firm and juicy, with a subtle flavour and an aroma that has hints of nutmeg. Mangoes come in several varieties and are available year-round. If the mangoes at the store are rock hard, pop them in a paper bag and let them rest on the counter for a day or two. Ripe ones smell like. . . well, mangoes, and are very slightly soft.

The tropical and subtropical climates of the world are the best places to grow mangoes. India produces more than half of the world’s crop, but mangos found in most North American markets come from Mexico and South America. I purchased Atulfo mangoes: cute and yellow, a bit smaller than their cousins, but just as delicious. They’re also loaded with nutrients (lots of fiber and over 20 vitamins and minerals). Mangoes can be pickled, dried, pureed, juiced, canned, or frozen.  Keep mango chunks in your freezer (up to 6 months) to use in smoothies—they compliment just about any kind of fruit.

Mango Seed

In the center of the mango is a long flat hard seed covered in coarse fuzz (seen at left above). Stand the mango on its fat end and you’ll see it tapers toward the top on either side. Place the blade of your knife a bit off center and slice off one side, then the other.  You can feel a bit of resistance when you get too close to the seed. I use the tip of a knife to cut diagonal slashes in the flesh, then turn the mangoes out so the cubes of fruit stick up. It looks cool, and you get lovely chunks of mango easily. There’s more than one way to peel a mango. Watch this video from the National Mango Board to learn more.

Cutting Mangoes
I use chunky mango in salads, salsa, and stir-fry as well as desserts (or in this case, breakfast). Usually I make cobbler with berries, but I had this can of peaches layin’ around and figured maybe the peaches and mangoes might enjoy each other’s company.

Cobbler is an extremely versatile recipe, and so easy to throw together with just about any kind of fruit. This is a rustic and homey dessert. The topping falls somewhere between “cakey” and “cookie.” I like mine a bit coarse and packed with a lot of flavour.  Depending on the fruit I’m using, I’ll vary the ingredients a bit. You can find over 100 ways to use mangoes in recipes from the National Mango Board.

Mango-Peach Cobbler

Using fresh fruit is the best option, but frozen mango or peach is fine, and canned peaches will do well enough in a pinch. Unless you’re a purist (or lactose intolerant), please do enjoy a bit of milk, fresh cream, or ice cream with your dessert.

Prepare the Fruit

  • 2 ripe mangoes, diced
  • 1 can peach halves, drained and diced
  • 1/4 Cup sugar to sweeten if needed
  • dash of cinnamon
  • dash of fresh grated nutmeg
  • dash of salt

Mix the Cobble

  • 1 Cup flour
  • 1 Cup sugar
  • 1/2 C ground walnuts
  • 1 tsp cinnamon
  • grated nutmeg (about 1/4 tsp)
  • dash of salt
  • 1 egg
  • 1 tsp vanilla
  • 4 tbs melted butter

Mix with a fork until combined. Sprinkle over fruit in a 9×9 pan.

Bake at 375° for about 35 minutes until topping is golden. Serve with ice cream or a glass of cold milk.

Mango Facts and More Fun:
Plant Cultures: Mango

Mango.org

Shelf Love: The White House Cookbook

Some time ago, on one of my forays through Vancouver’s used book stores, I happened upon a stack of noticeably old cookbooks, so old it was difficult to make out the words on the binding. The big white book at the very bottom of the pile was calling to me. The shopkeep kindly climbed her stepladder to retrieve it and a few others from her top shelf, and I sat down to have a look see.
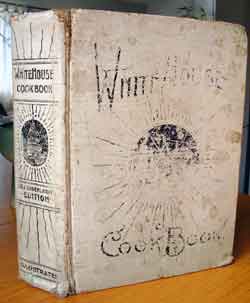
WHCB CoverOld cookbooks are some of the very best reference books. Methods and ingredients are typically simple, basic, and locally sourced without a lot of fussiness. These recipes are just the thing I want when I’m feeling creative or when I’m trying a new technique. Pioneers, settlers, and pre-industrial cooks did most things from scratch, and recipes had to be reliable. It must have been such a gas to work on a cookbook back when there weren’t a lot of them around, back when books were precious and kept and handed down.

When I finally got that book in my hands and realized what it was, I was struck by an urgency to possess it for my collection. The cover is worn so that only a mild impression of the cover art remains, and the binding is a little shaky, but has so far lasted beyond a century. The pages have a feel unlike modern books and are fragile due to their age. Some pages have stains and marks, and sadly one or two pages are gone (easily replaced by a photocopy, though). The binding reads “WhiteHouse Cook Book , New And Enlarged Edition, Illustrated” hinting that this is not the first printing. However, there is no publication data, no copyright page. Perhaps it fell out. I have 590 numbered pages, expecting that a couple are missing from the index at the back, since it ends at Macaroni, timbale of. I confess that despite its condition, holding in my hands a piece of history makes me giddy.

The book is dedicated “To the wives of our presidents, those noble women who have graced the White House, and whose names and memories are dear to all Americans.” Illustrations, though few, are a delight. In addition to a couple of photos of food preparation, there are plates illustrating meat carving and butchering, as well as the famous rooms (and women) of the White House.

WHCBwives

Chapters cover a wide range of subjects essential for running one’s home at the turn of the century. In addition to a section devoted entirely to 10 types of “Catsups” (that’s ketchup to some folks) as well as a “Confectionery” chapter for all your pre-industrial candy-making needs, there is a wealth of information about cooking for the sick, dying your own fabrics, making household cleaning products and toiletries, and a whole 5 pages describing 20 ways to make toast (including a recipe that looks very similar to French Toast, but is patriotically titled “American Toast”).

The chapter entitled “Health Suggestions” offers a remedy or preventative for everything from earaches and chillbains to lockjaw and cholera, including a helpful chart showing “Time of Digestion” for a variety of foods. In “Miscellaneous Recipes,” you can learn to make your own glue, wallpaper paste, and soap. Plus, there are instructions for making “Incombustible Dresses” with the warning “Remember this and save the lives of your children.” Also, among the “Facts Worth Knowing” are tips for keeping ants out of your sugar, destroying cockroaches, and banishing rats, as well as how to clean and care for darn near everything a household could need.

The Publisher’s Preface clearly states that this book “more fully represents the progress and present perfection of the culinary art than any previous work.” Contributor Mr. Hugo Ziemann comes with an exciting work history, having once catered for Prince Napoleon (who was killed during a war with the Zulus of Africa), not to mention his hotel experience in Paris, New York, and Chicago. Mrs. Fanny Lemira Gillette’s credentials aren’t so exotic, though it is written she was “no less proficient and capable, having made a lifelong and thorough study of cookery and housekeeping.” (iii) If the name Gillette sounds familiar, that is no mistake. Her son King invented the safety razor and helped introduce Americans to the “disposable” lifestyle before losing his fortune in the stock market crash of 1929.*

A single post really isn’t enough to do this cookbook justice, so I’ll save some commentary and share some interesting tidbits in future posts. If you’re interested, you can look through the entire book online via Google Books.

* NNDB: King Camp Gillette